
In this guide
What you will complete
You will create a dedicated WordPress credential, connect it to the correct Rankboard project, and send a test draft.
- 1Create a dedicated Application Password
- 2Open Rankboard integrations
- 3Enter the connection details
- 4Connect and choose the publishing mode
What you need
Collect these details before you start the connection.
- Site URL
- https://yourblog.com
- Username
- A WordPress user allowed to create and edit posts
- Credential
- An Application Password owned by that user
- WordPress
- Version 5.6 or newer, with REST API access over HTTPS
Connect WordPress
Complete each step in order. Provider screenshots link to their original documentation.
- 1
Create a dedicated Application Password
Sign in to WordPress as the account Rankboard should publish from. Select Users → Profile, then find Application Passwords.
Enter Rankboard as the application name, select Add New Application Password, and copy the generated password. WordPress displays it once.
- Use an Application Password, not the user's normal WordPress login password.
- The WordPress user must have permission to upload media and create, edit, and publish posts for the publishing mode you select.
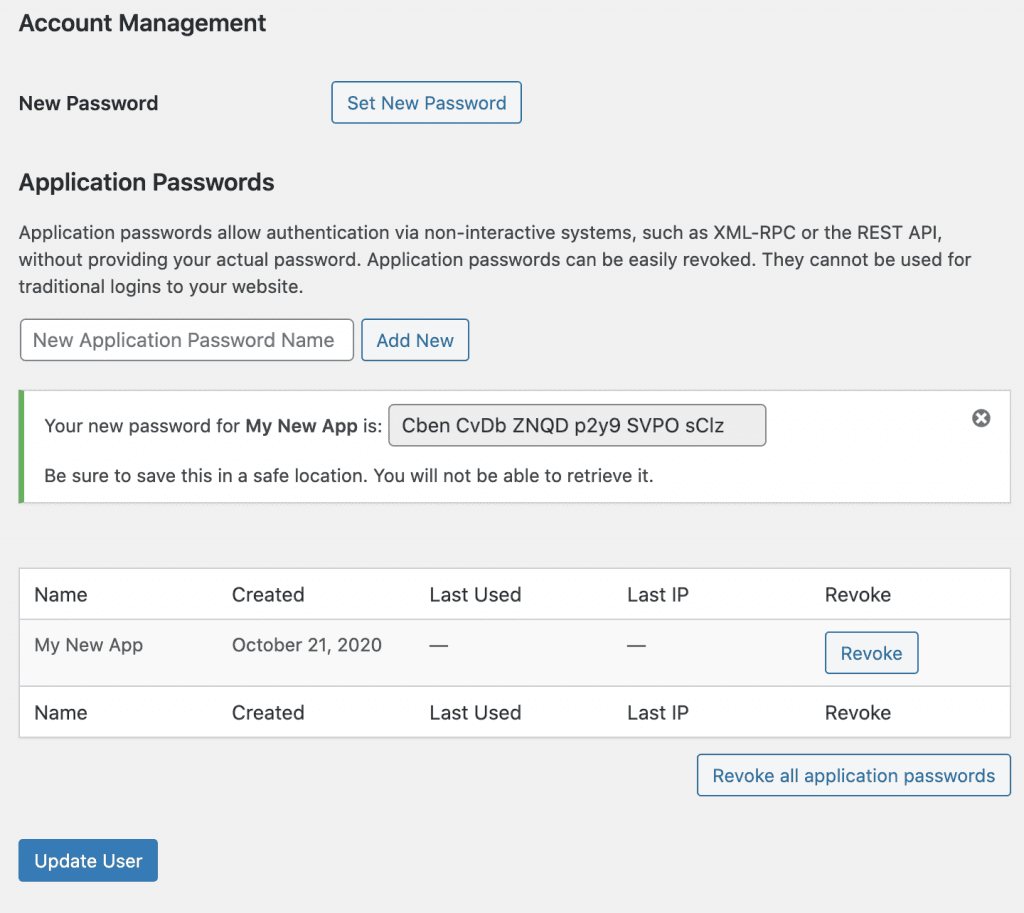
The Application Passwords section appears on the WordPress user profile. Copy the generated password when it is shown. Source: WordPress Core documentation ↗ - 2
Open Rankboard integrations
In Rankboard, open the project for this website. Select Settings → Integrations, then choose WordPress.
- 3
Enter the connection details
Enter the public Site URL, WordPress username, and new Application Password. Use the site root, such as https://example.com. Do not add /wp-admin or /wp-json.
- 4
Connect and choose the publishing mode
Select Connect WordPress. Rankboard checks the WordPress REST API before it saves the connection. Under Settings → Articles, select Draft when an editor must approve each post in WordPress.
Data Rankboard sends
Review the data this integration reads or writes before you connect it.
- Title, slug, article HTML, and meta description
- Draft or published status, according to the project publishing mode
- A generated featured image when the article has one
- Supported JSON-LD schema embedded with the article
- Updates to the existing WordPress post after the first successful sync
Confirm the connection works
Run one draft test and verify the result before you enable direct publishing.
- Rankboard authenticates against the WordPress REST API when you save the connection.
- After sending an article, open its CMS link from Rankboard and confirm the title, slug, body, excerpt, featured image, and status in WordPress.
- For a draft-first project, confirm that the post is Draft and is not publicly visible.
Fix common connection errors
Match the error to the issue below, then retry the connection.
WordPress returns 401 or 403.
Confirm that you used an Application Password, that it belongs to the username entered in Rankboard, and that a security plugin or proxy is not removing the Authorization header.
The REST API cannot be reached.
Open https://your-site.com/wp-json/ in a browser. Confirm HTTPS works, the URL is public, and your host or security plugin allows REST API requests.
Text publishes but the featured image fails.
Give the WordPress user media upload permission and confirm the site can fetch the image URL. The article can still be reviewed without the image while you correct media permissions.
Protect your credentials
Limit access, keep secrets private, and revoke credentials when the connection is no longer needed.
- Create a separate, revocable Application Password named for Rankboard.
- Use the least-privileged WordPress role that can perform your intended draft or publish workflow.
- Revoke the Application Password in WordPress and disconnect the integration in Rankboard when access is no longer needed.
Read the Privacy Policy and Terms & Conditions for service-wide data terms.
Check the official documentation
Use these provider resources when an interface or policy changes after this guide is reviewed.